こんにちは、テルプロです!
「Flutterで簡単なアプリを作ってみたい」とお悩みではないでしょうか?
テルプロ
本記事ではそんな悩みを解決していきます!
本記事を読むことで
- Flutterで簡単なアプリの作り方がわかるようになる
- コードを公開しているので、自分の環境で確かめることができる
Flutterで割り勘アプリを作る
事前準備
パッケージをインストール
今回使用するパッケージは以下の通りです。
dependencies:
  flutter:
    sdk: flutter
  flutter_svg: ^1.0.3

dev_dependencies:
  flutter_lints: ^1.0.0
  flutter_test:
    sdk: flutter
プロジェクト構成
リポジトリ構成

完成イメージ
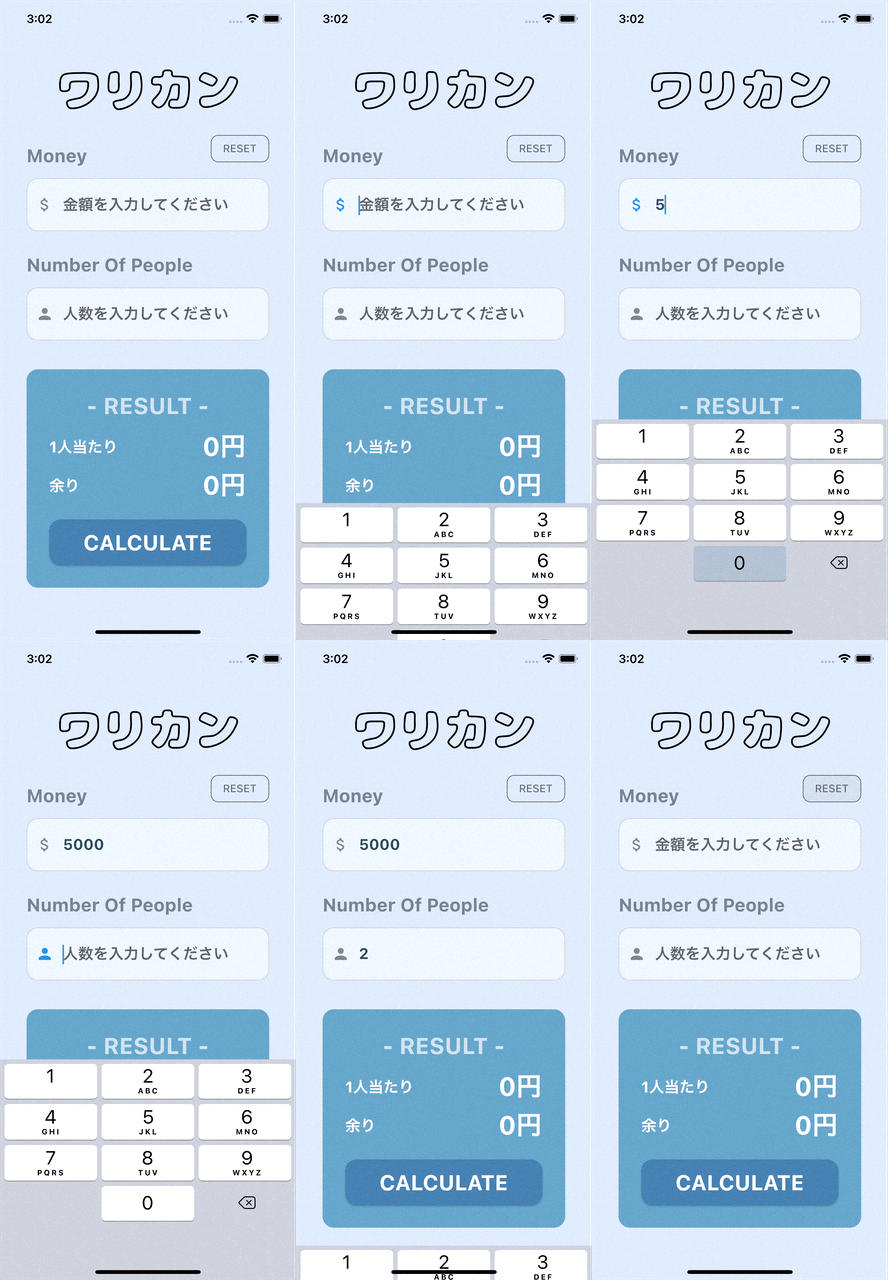
本アプリは1画面のみの構成になります。金額と割りたい人数を入力し、ボタンを押したら「1人当たりの金額」と「余りの金額」が表示されるようような設計にしています。
ソースコード
main.dart
import 'package:flutter/material.dart';
import 'package:flutter_svg/flutter_svg.dart';
void main() {
runApp(const MyApp());
}
class MyApp extends StatelessWidget {
const MyApp({Key? key}) : super(key: key);
// This widget is the root of your application.
@override
Widget build(BuildContext context) {
return const MaterialApp(
debugShowCheckedModeBanner: false, //
title: 'Warikan App',
home: HomePage(),
);
}
}
class HomePage extends StatefulWidget {
const HomePage({Key? key}) : super(key: key);
@override
_HomePageState createState() => _HomePageState();
}
class _HomePageState extends State<HomePage> {
// 共通スタイル
TextStyle titleStyle = const TextStyle(
fontSize: 24.0,
fontWeight: FontWeight.bold,
);
OutlineInputBorder outlineInputBorder = OutlineInputBorder(
borderRadius: BorderRadius.circular(15.0),
borderSide: const BorderSide(color: Color(0xFFd3d3d3)),
);
// それぞれの値
int money = 0;
int person = 1;
// 結果的な値
double perPerson = 0;
int rem = 0;
// コントローラ
TextEditingController moneyController = TextEditingController();
TextEditingController taxController = TextEditingController();
TextEditingController personController = TextEditingController();
// 一人当たりの金額を計算するメソッド
String calculatePerPerson() {
perPerson = money / person;
return perPerson.toString();
}
// 余りの金額を計算するメソッド
String calculateRem() {
rem = money % person;
return rem.toString();
}
@override
Widget build(BuildContext context) {
return Scaffold(
backgroundColor: const Color(0xFFE0ECFF),
body: SafeArea(
child: GestureDetector(
onTap: () => FocusScope.of(context).unfocus(),
child: SingleChildScrollView(
child: Column(
children: [
Container(
padding: const EdgeInsets.symmetric(
vertical: 25.0,
horizontal: 35.0,
),
child: Column(
mainAxisAlignment: MainAxisAlignment.start,
crossAxisAlignment: CrossAxisAlignment.start,
children: [
Center(
child: SvgPicture.asset(
'assets/logo.svg',
height: 100.0,
),
),
Row(
crossAxisAlignment: CrossAxisAlignment.end,
mainAxisAlignment: MainAxisAlignment.spaceBetween,
children: [
Text(
"Money",
style: titleStyle.copyWith(
color: const Color(0xFF758492),
),
),
OutlinedButton(
child: const Text('RESET'),
style: OutlinedButton.styleFrom(
primary: Colors.black54,
shape: RoundedRectangleBorder(
borderRadius: BorderRadius.circular(10),
),
side: const BorderSide(color: Colors.black54),
),
onPressed: () {
setState(() {
// 入力した値をリセットする
moneyController.clear();
personController.clear();
perPerson = 0;
rem = 0;
});
},
),
],
),
const SizedBox(height: 15.0),
TextField(
controller: moneyController,
keyboardType: const TextInputType.numberWithOptions(),
decoration: InputDecoration(
filled: true,
fillColor: const Color(0xFFf0f8ff),
border: outlineInputBorder,
focusedBorder: outlineInputBorder,
enabledBorder: outlineInputBorder,
hintText: "金額を入力してください",
prefixIcon: const Icon(Icons.attach_money_rounded),
),
style: const TextStyle(
fontSize: 20.0,
fontWeight: FontWeight.bold,
color: Color(0xFF2B4C5A),
),
),
const SizedBox(
height: 30.0,
),
Text(
"Number Of People",
style: titleStyle.copyWith(
color: const Color(0xFF758492),
),
),
const SizedBox(height: 15.0),
TextField(
controller: personController,
keyboardType: const TextInputType.numberWithOptions(),
decoration: InputDecoration(
filled: true,
fillColor: const Color(0xFFf0f8ff),
border: outlineInputBorder,
focusedBorder: outlineInputBorder,
enabledBorder: outlineInputBorder,
hintText: "人数を入力してください",
prefixIcon: const Icon(Icons.person),
),
style: const TextStyle(
fontSize: 20.0,
fontWeight: FontWeight.bold,
color: Color(0xFF2B4C5A),
),
),
const SizedBox(
height: 38.0,
),
Container(
padding: const EdgeInsets.all(30.0),
width: double.infinity,
decoration: BoxDecoration(
color: const Color(0xFF67A7CC),
borderRadius: BorderRadius.circular(15.0),
),
child: Column(
mainAxisAlignment: MainAxisAlignment.spaceEvenly,
crossAxisAlignment: CrossAxisAlignment.center,
children: [
const Text(
"- RESULT -",
style: TextStyle(
color: Colors.white70,
fontSize: 30.0,
fontWeight: FontWeight.bold,
),
),
const SizedBox(
height: 10.0,
),
Row(
mainAxisAlignment: MainAxisAlignment.spaceBetween,
children: [
Column(
crossAxisAlignment: CrossAxisAlignment.start,
children: const [
Text(
"1人当たり",
style: TextStyle(
color: Colors.white,
fontSize: 20.0,
fontWeight: FontWeight.bold,
),
),
],
),
const SizedBox(width: 10.0),
Text(
"${perPerson.toInt()}円",
style: const TextStyle(
color: Colors.white,
fontSize: 34.0,
fontWeight: FontWeight.bold,
),
),
],
),
Row(
mainAxisAlignment: MainAxisAlignment.spaceBetween,
children: [
FittedBox(
fit: BoxFit.fitWidth,
child: Column(
crossAxisAlignment:
CrossAxisAlignment.start,
children: const [
Text(
"余り",
style: TextStyle(
color: Colors.white,
fontSize: 20.0,
fontWeight: FontWeight.bold,
),
),
],
),
),
const SizedBox(
width: 10.0,
),
Text(
"${rem}円",
style: const TextStyle(
color: Colors.white,
fontSize: 34.0,
fontWeight: FontWeight.bold),
),
],
),
const SizedBox(height: 20.0),
Container(
width: double.infinity,
height: 60.0,
decoration: BoxDecoration(
borderRadius: BorderRadius.circular(15.0),
),
child: ElevatedButton(
child: const Text(
'CALCULATE',
style: TextStyle(
color: Colors.white,
fontSize: 28.0,
fontWeight: FontWeight.bold,
),
),
style: ElevatedButton.styleFrom(
primary: const Color(0xFF4682b4),
shape: RoundedRectangleBorder(
borderRadius: BorderRadius.circular(15),
),
),
onPressed: () {
setState(() {
// 計算を実行する
money = int.parse(moneyController.text);
person = int.parse(personController.text);
calculatePerPerson();
calculateRem();
});
},
),
),
],
),
),
],
),
),
],
),
),
),
),
);
}
}
大変お疲れ様でした!以上でアプリは完成です!
今回ご紹介したアプリ全体のソースコードはこちらです。
よろしければ、ご参考にどうぞ。
GitHub:https://github.com/terupro/warikan_app
まとめ
今回は、Flutterを用いた「割り勘アプリの作り方」をご紹介しました。
この程度のアプリであれば、これだけ少ないコードで実装することができます。良ければ上記のコードを参考に、色々と試してみてください。
▼以下では、私の実体験に基づいて「Flutterの効率的な勉強法」の具体的な手順を詳しく解説しています。よろしければご参考にどうぞ。
最後までご覧いただきありがとうございました。ではまた!
